如何在 Azure Entra ID 中設定 SSO
· 閱讀時間約 6 分鐘

在現代應用程式中,單一登入(Single Sign-On, SSO)是一個非常重要的功能,它可以讓使用者在多個應用程式之間無縫切換,而不需要重複登入。Azure Entra ID 是 Azure 的一個身份驗證服務,可以幫助開發者實現 SSO 功能。本文將介紹如何在 Azure Entra ID 中設定 SSO,並且整合到自己開發的應用程式中。
什麼是 Azure Entra ID
Azure Entra ID 是 Azure 的一個身份驗證服務,提供了一個安全、可擴展的身份驗證解決方案,可以幫助開發者實現 SSO 功能。Azure Entra ID 支持多種身份驗證方式,包括密碼、多因素身份驗證、社交登入等。
必要準備
- Azure 訂閱帳戶
建立 Enterprise 應用程式
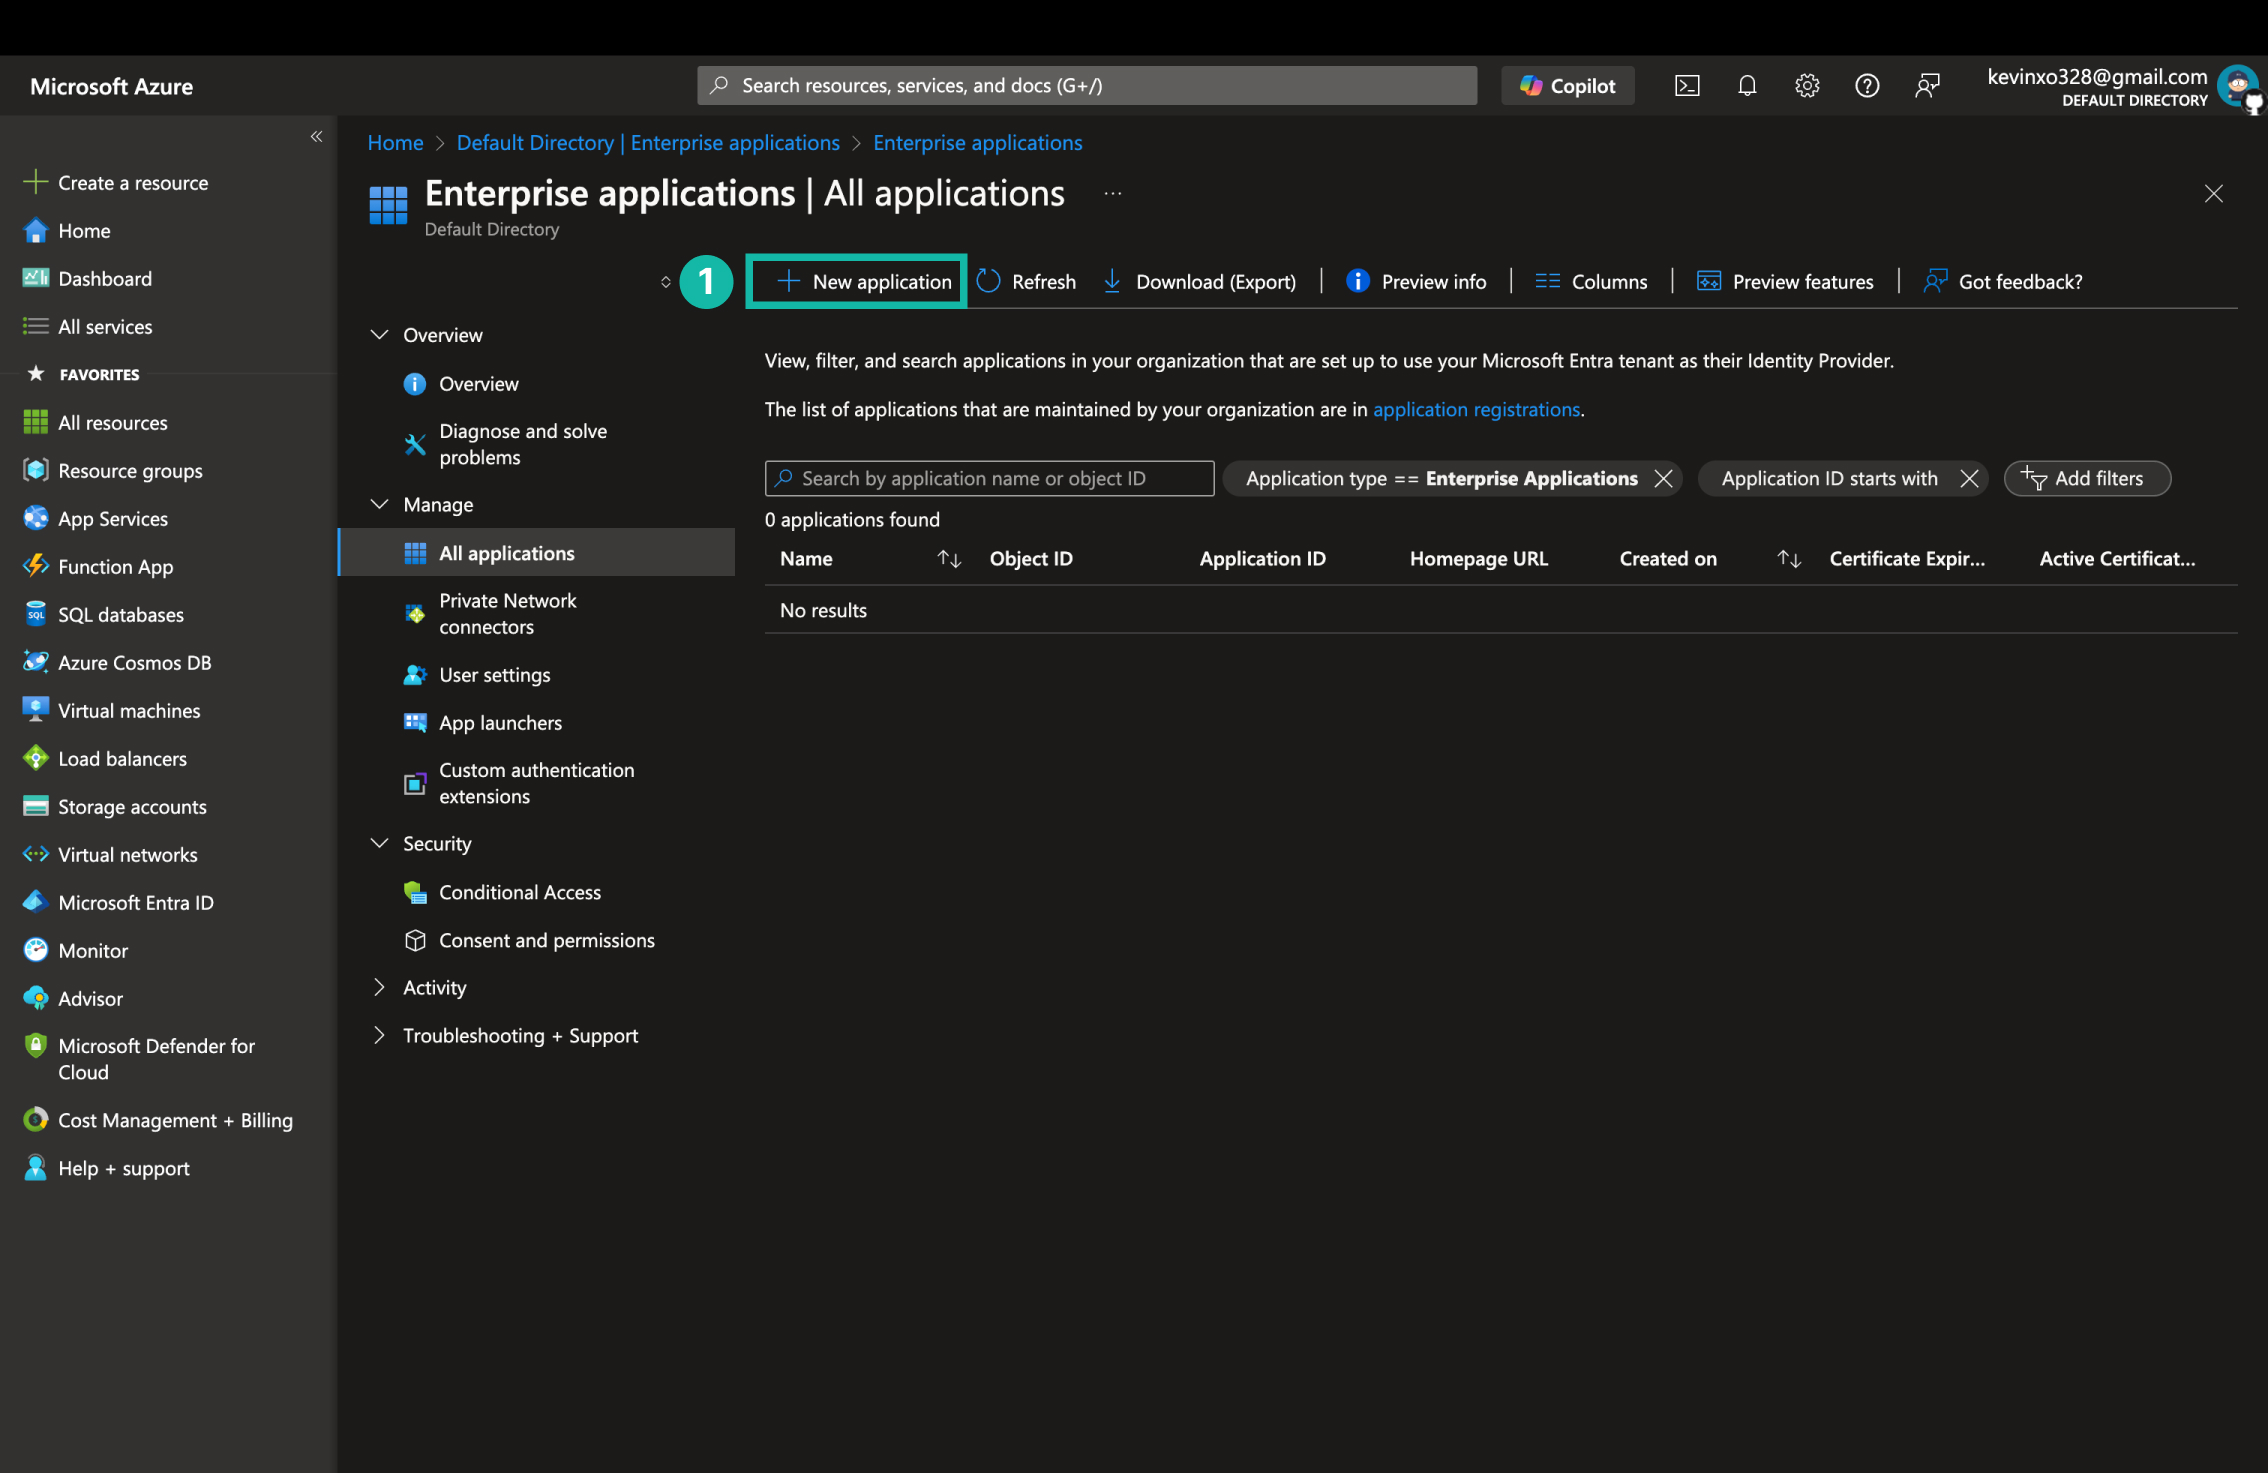
- 登入 Azure 入口網站,選擇 Microsoft Entra ID,進入 Enterprise applications,點擊 Add application。
設定 Enterprise 應用程式
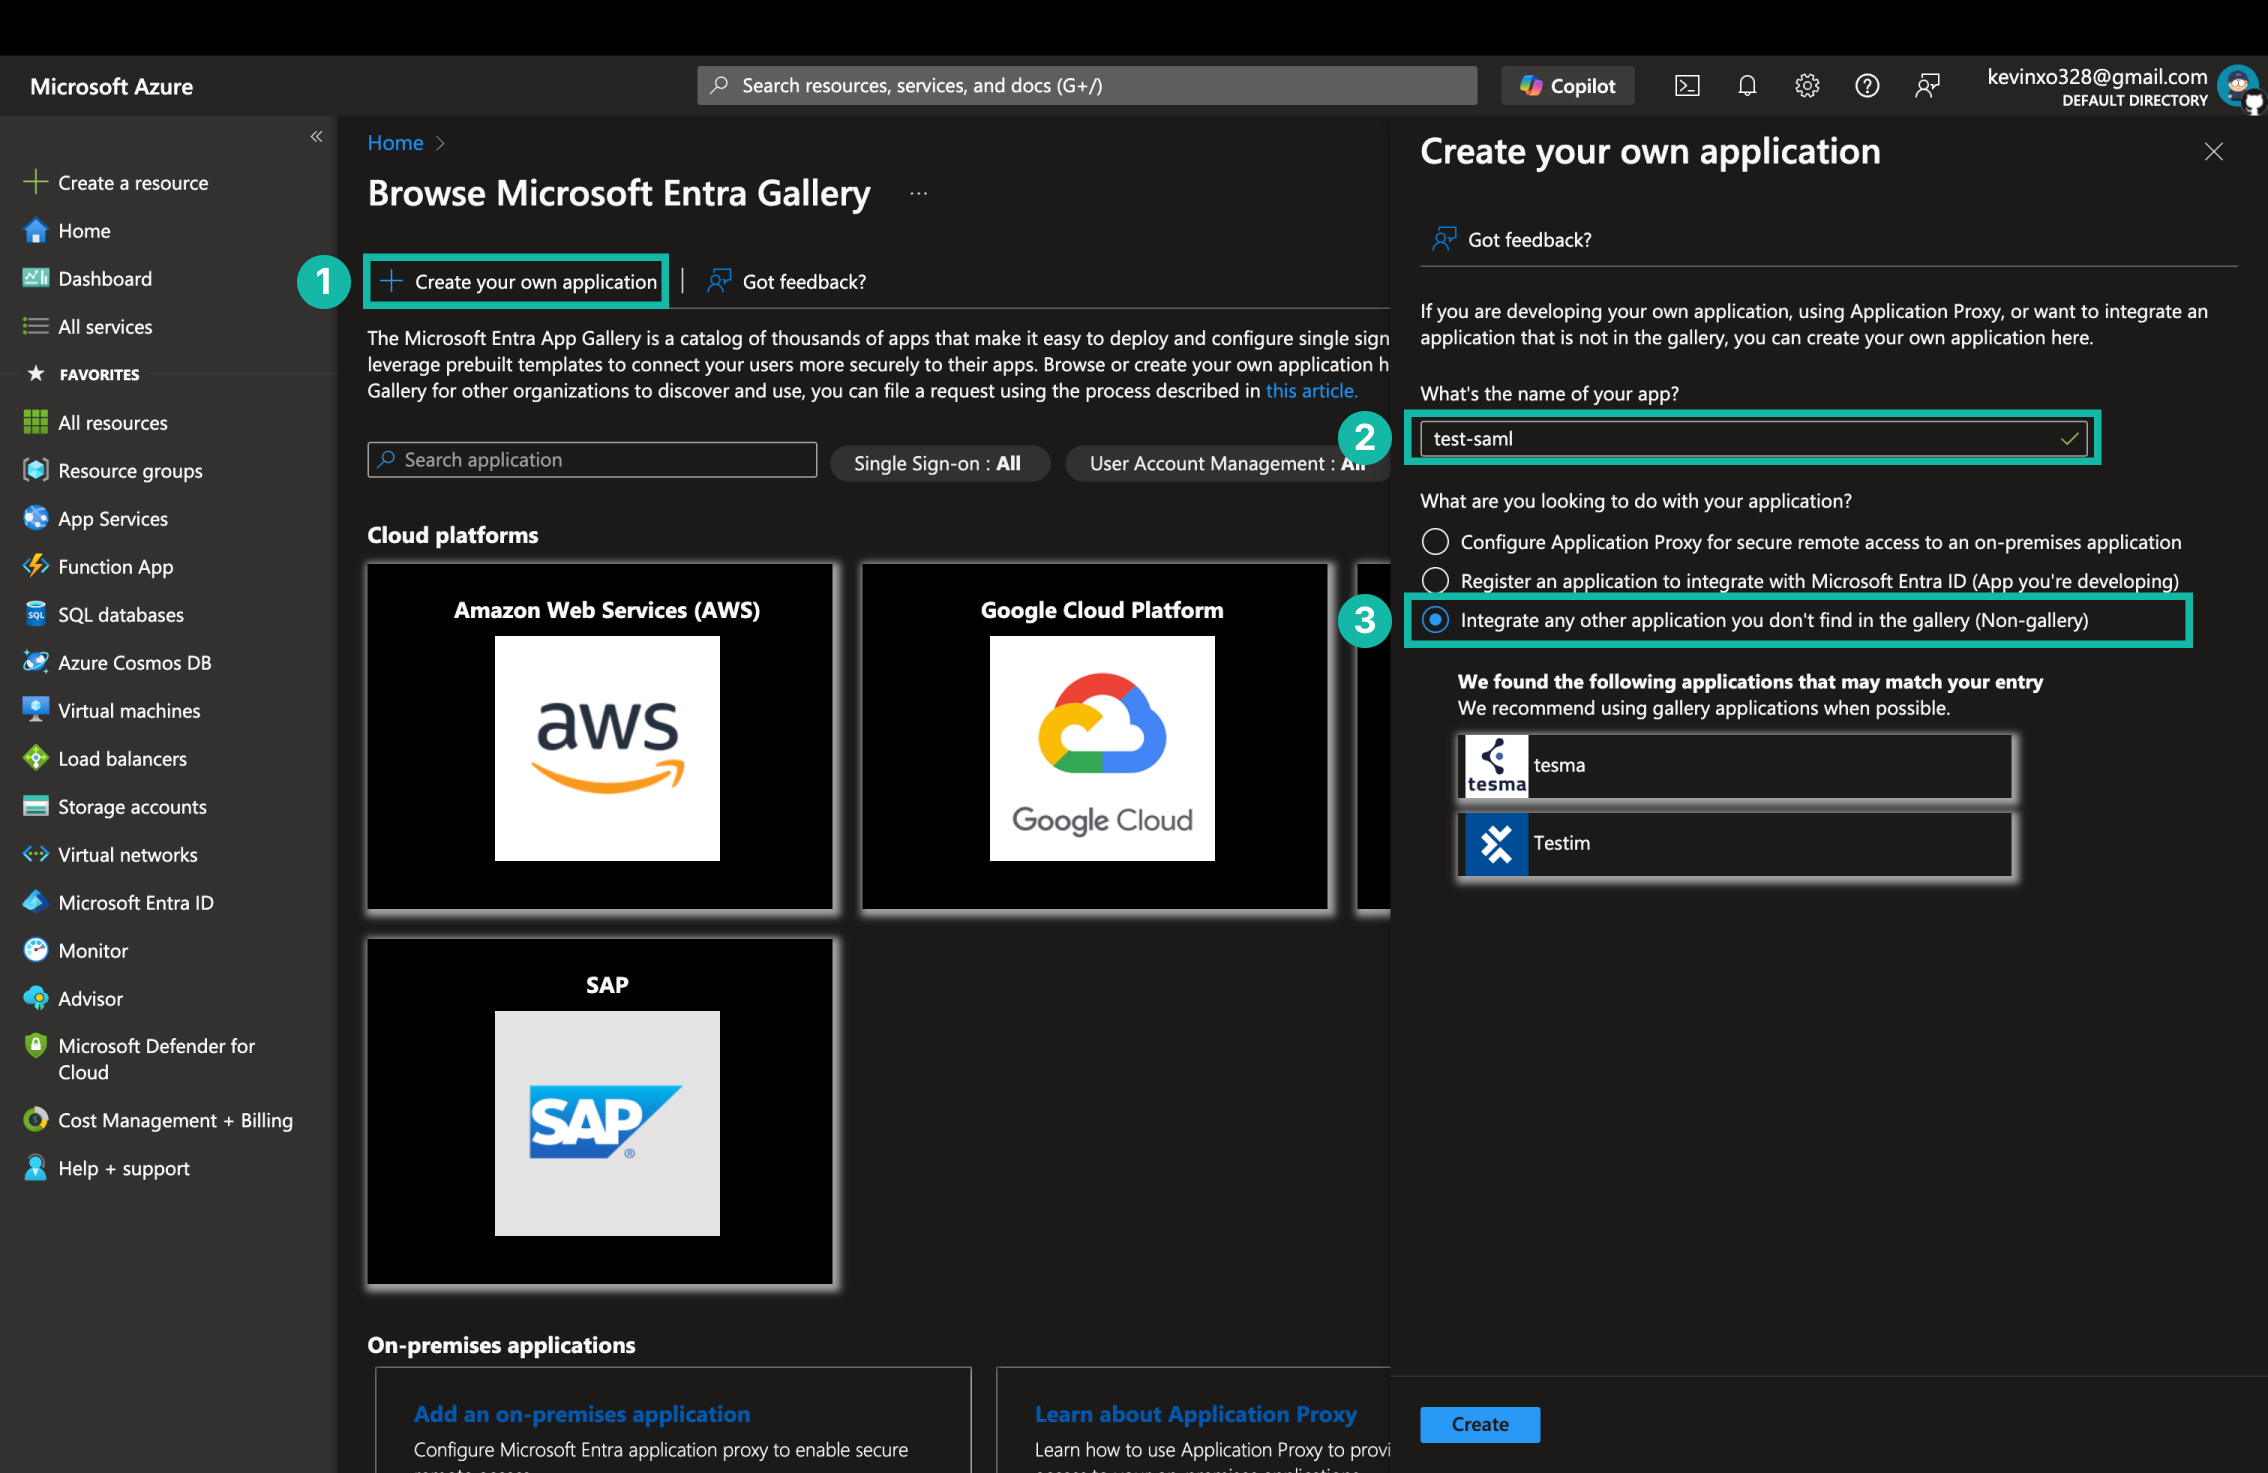
- 點擊 Create your own application。
- 輸入應用程式名稱
- 選擇 Integrate any other application you don't find in the gallery (Non-gallery),後點擊 Create。
加入可以登入的使用者和群組
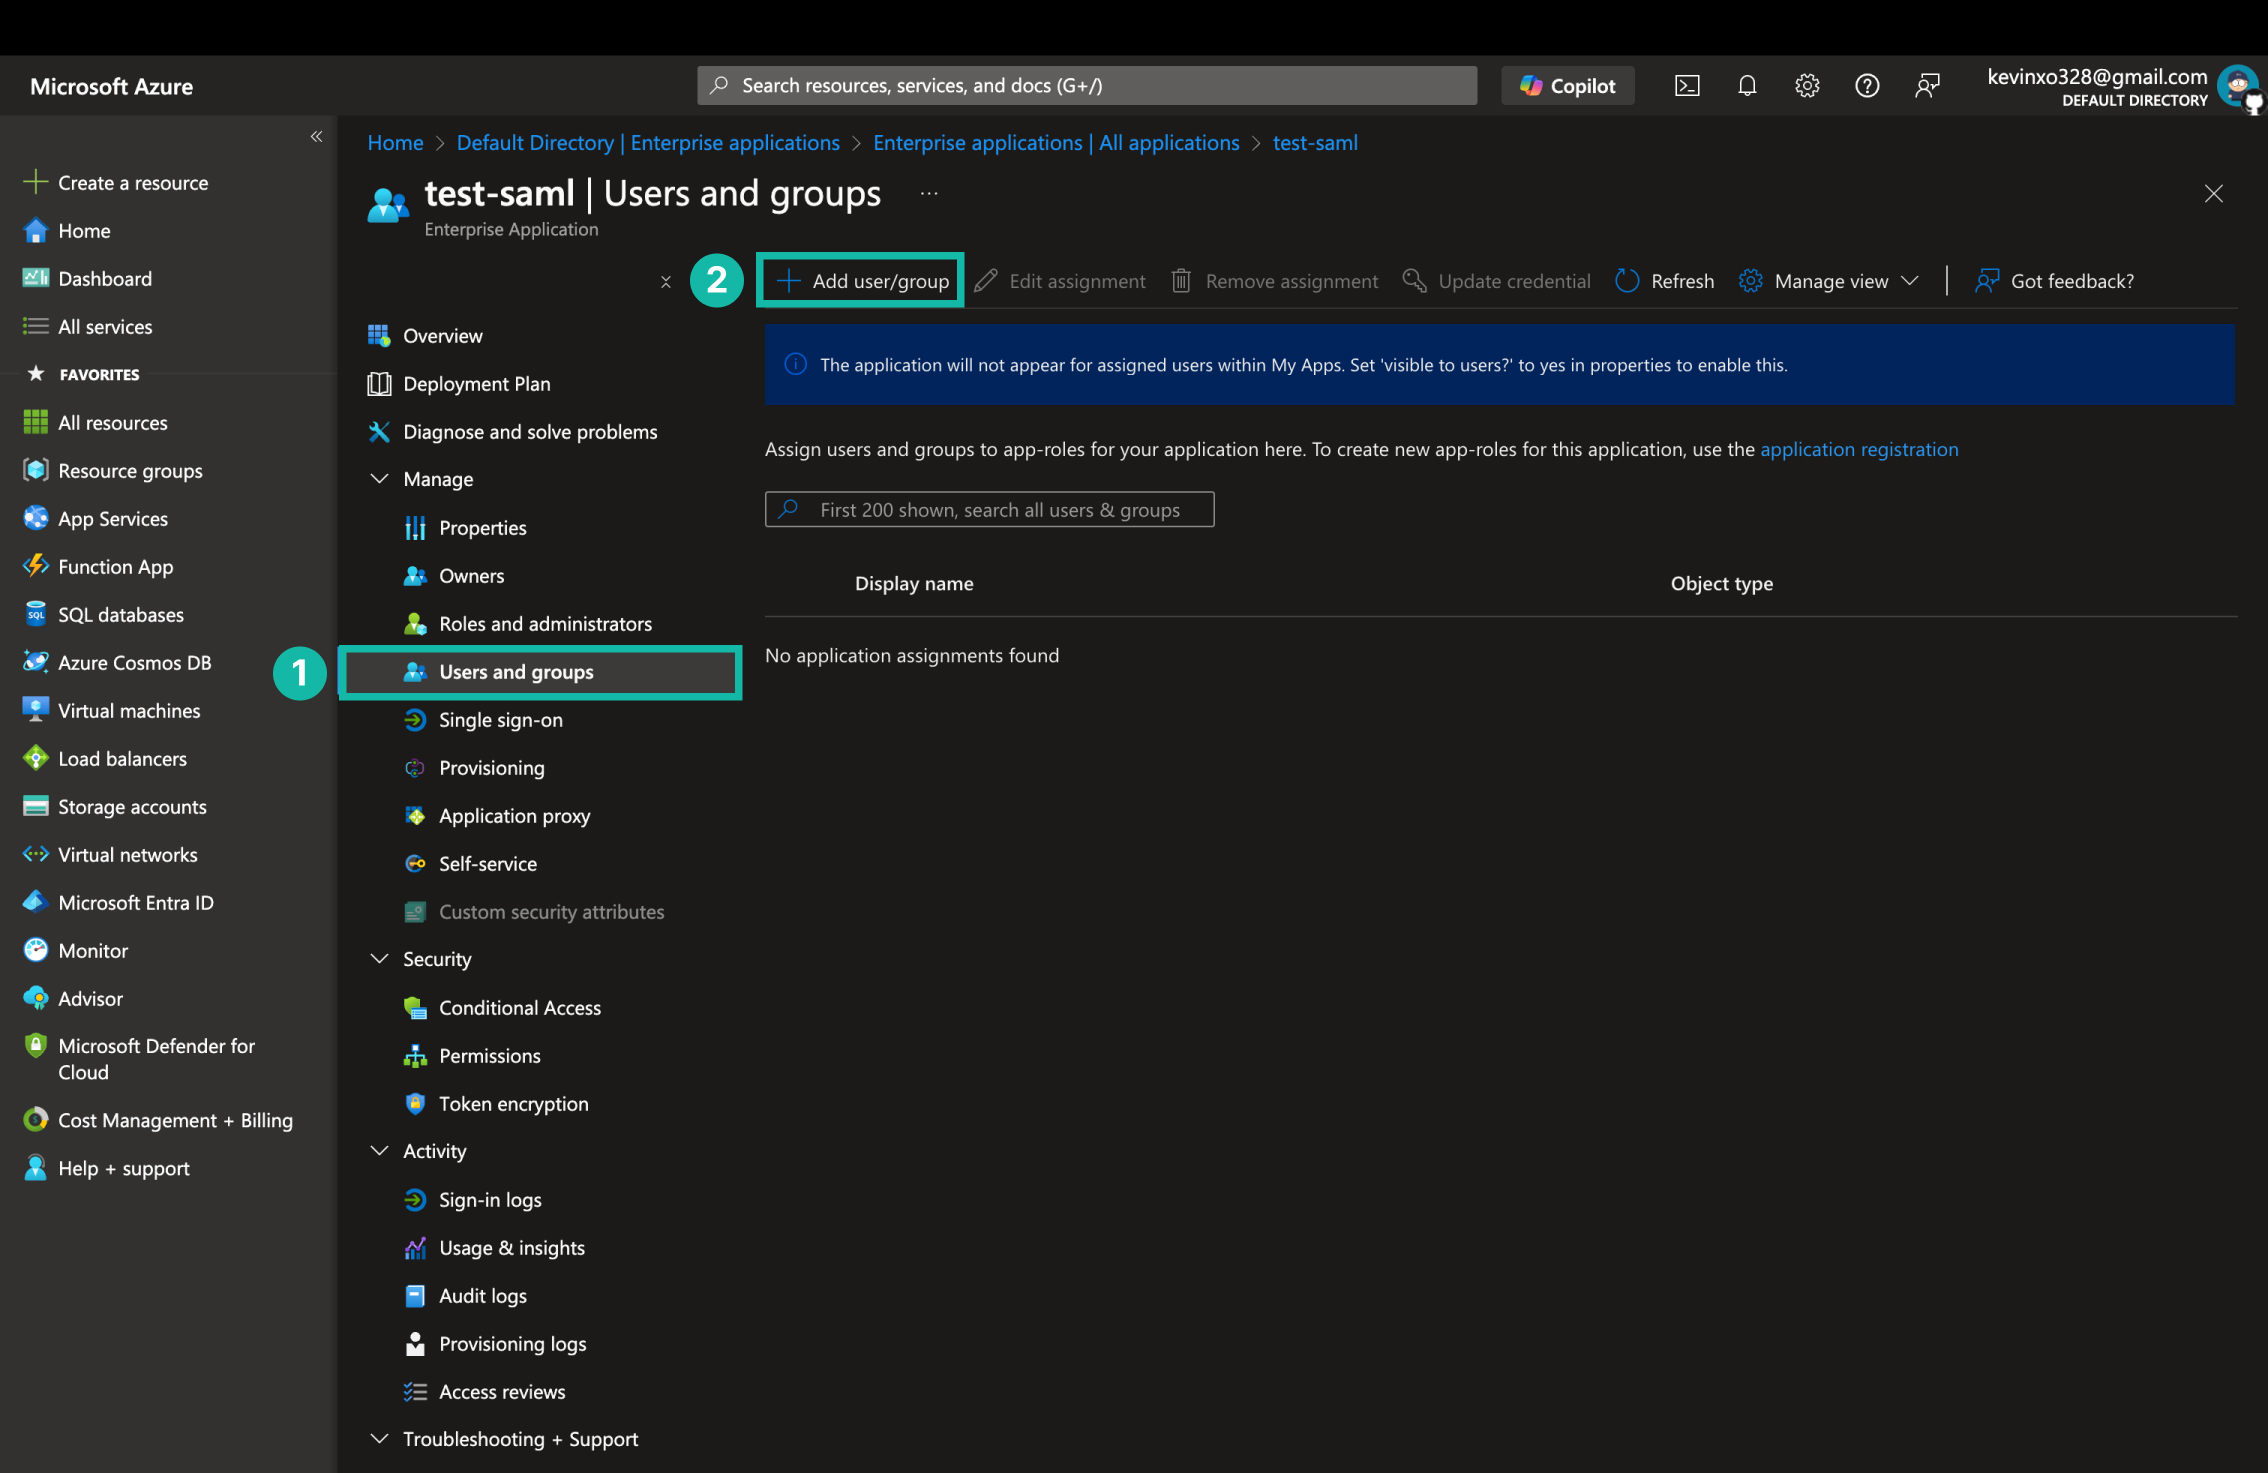
- 進入建立好的 Enterprise 應用程式,點擊 Users and groups。
- 點擊 Add user,選擇可以登入的使用者或群組後儲存。
設定 SSO 模式
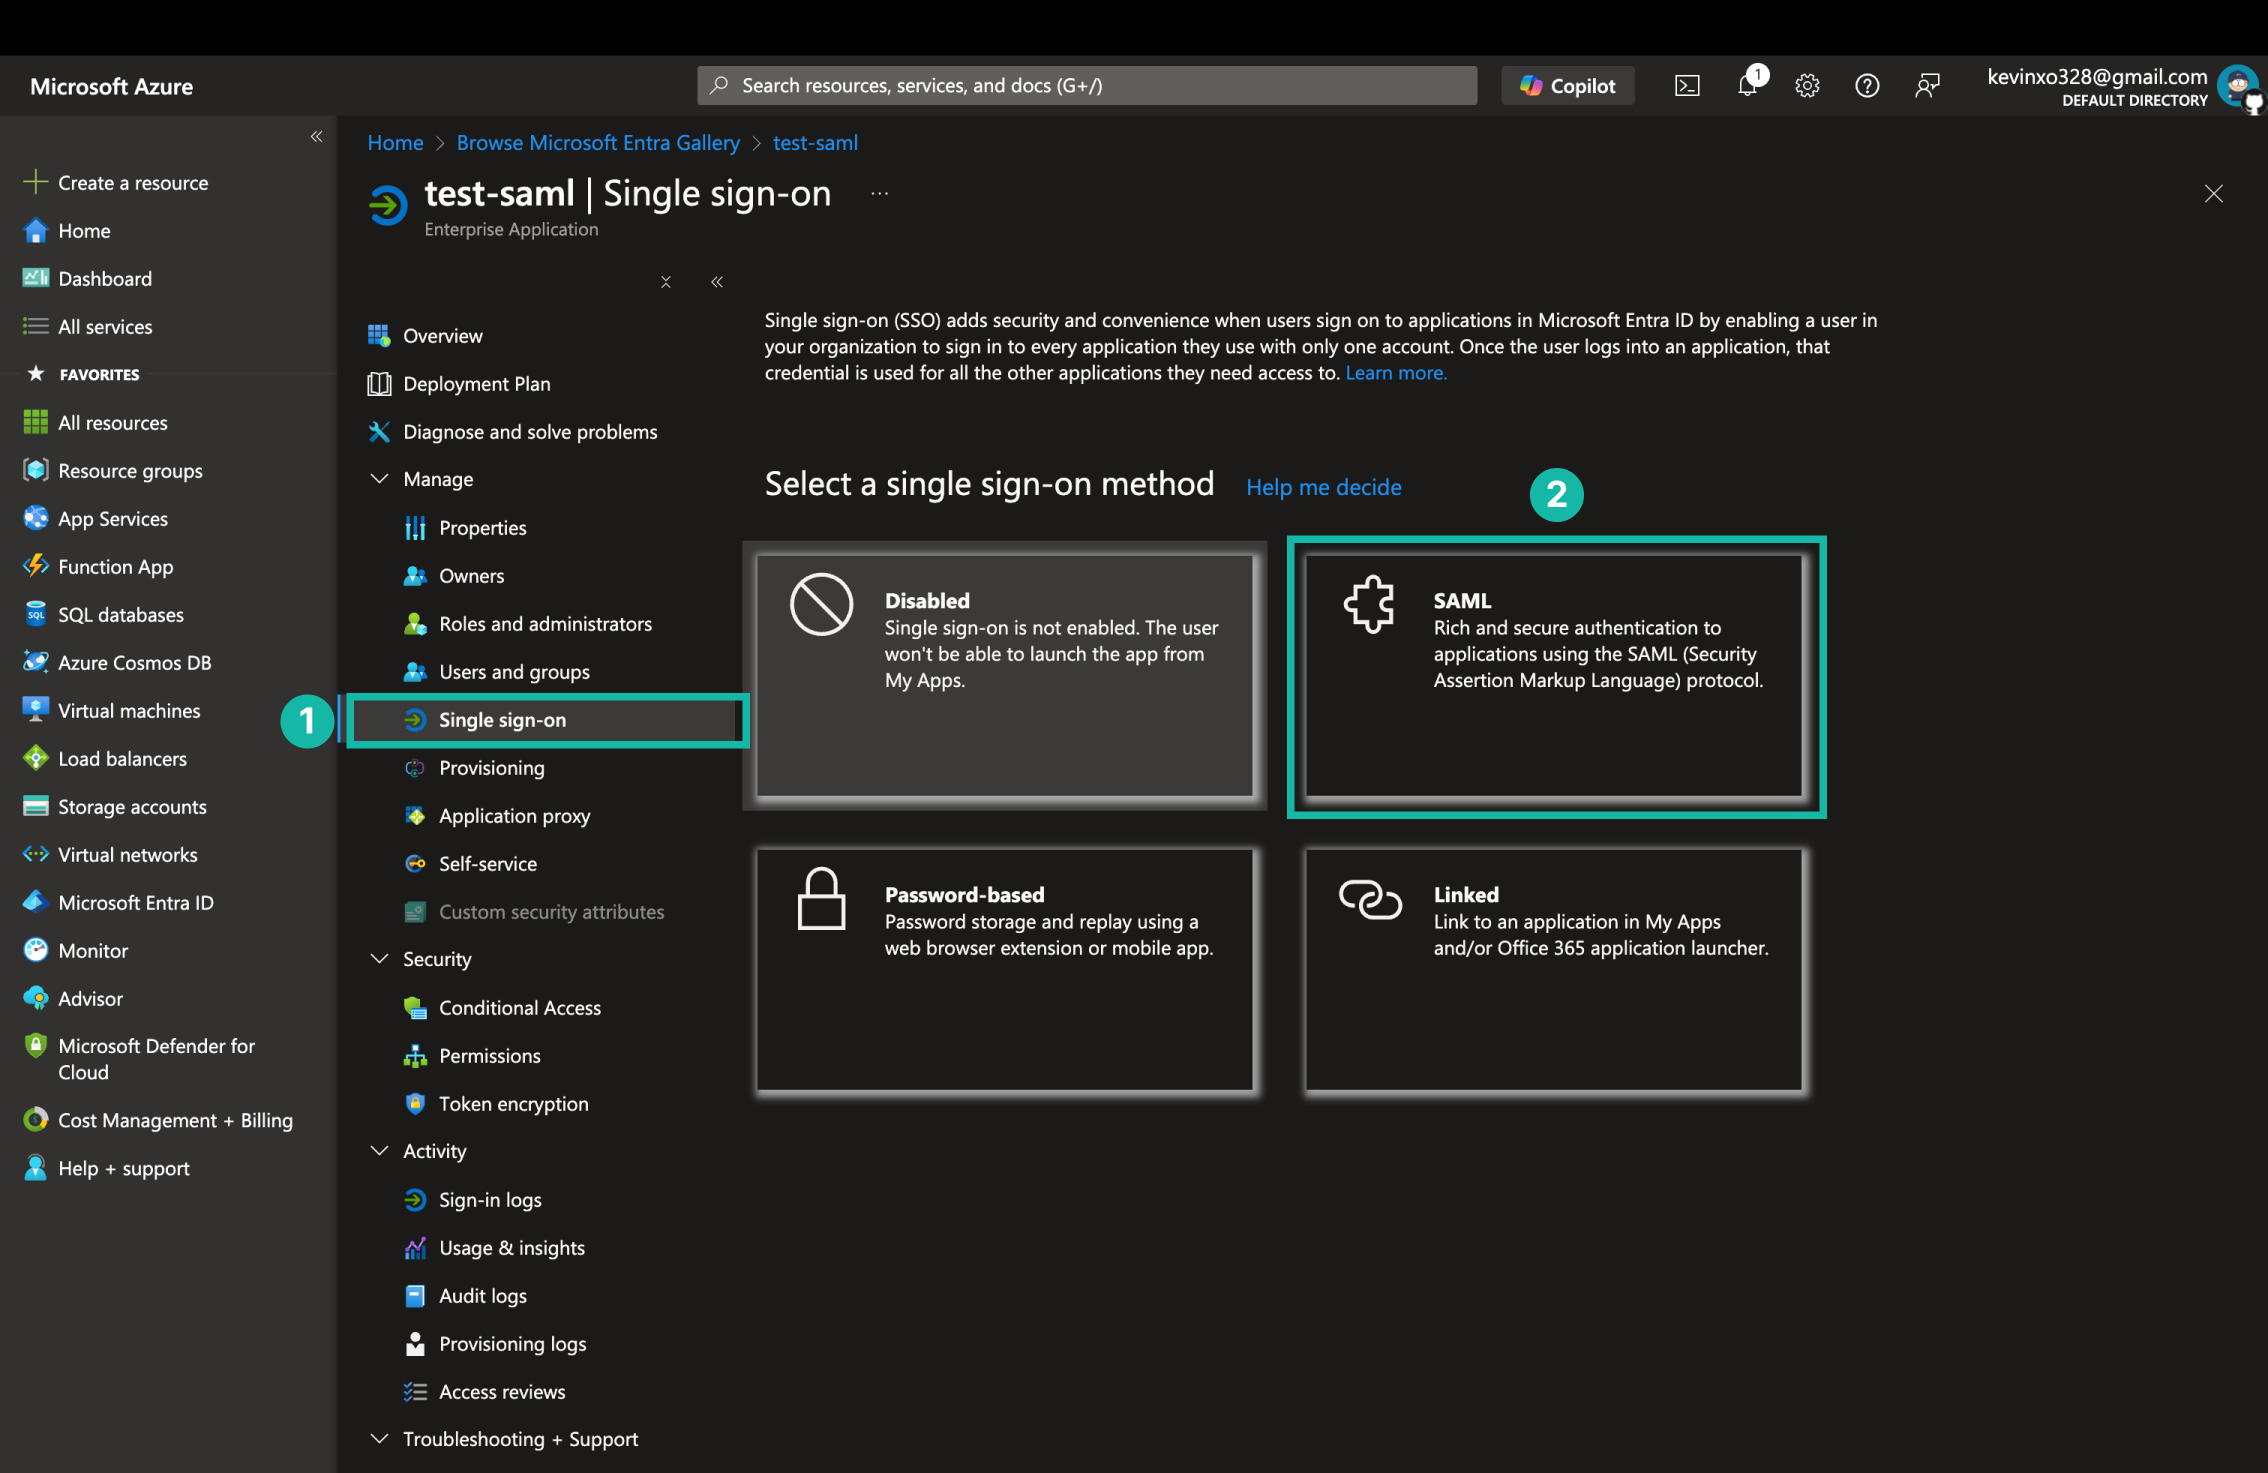
- 進入 Enterprise 應用程式,點擊 Single sign-on。
- 選擇 SAML。
設定 SAML 基本設定
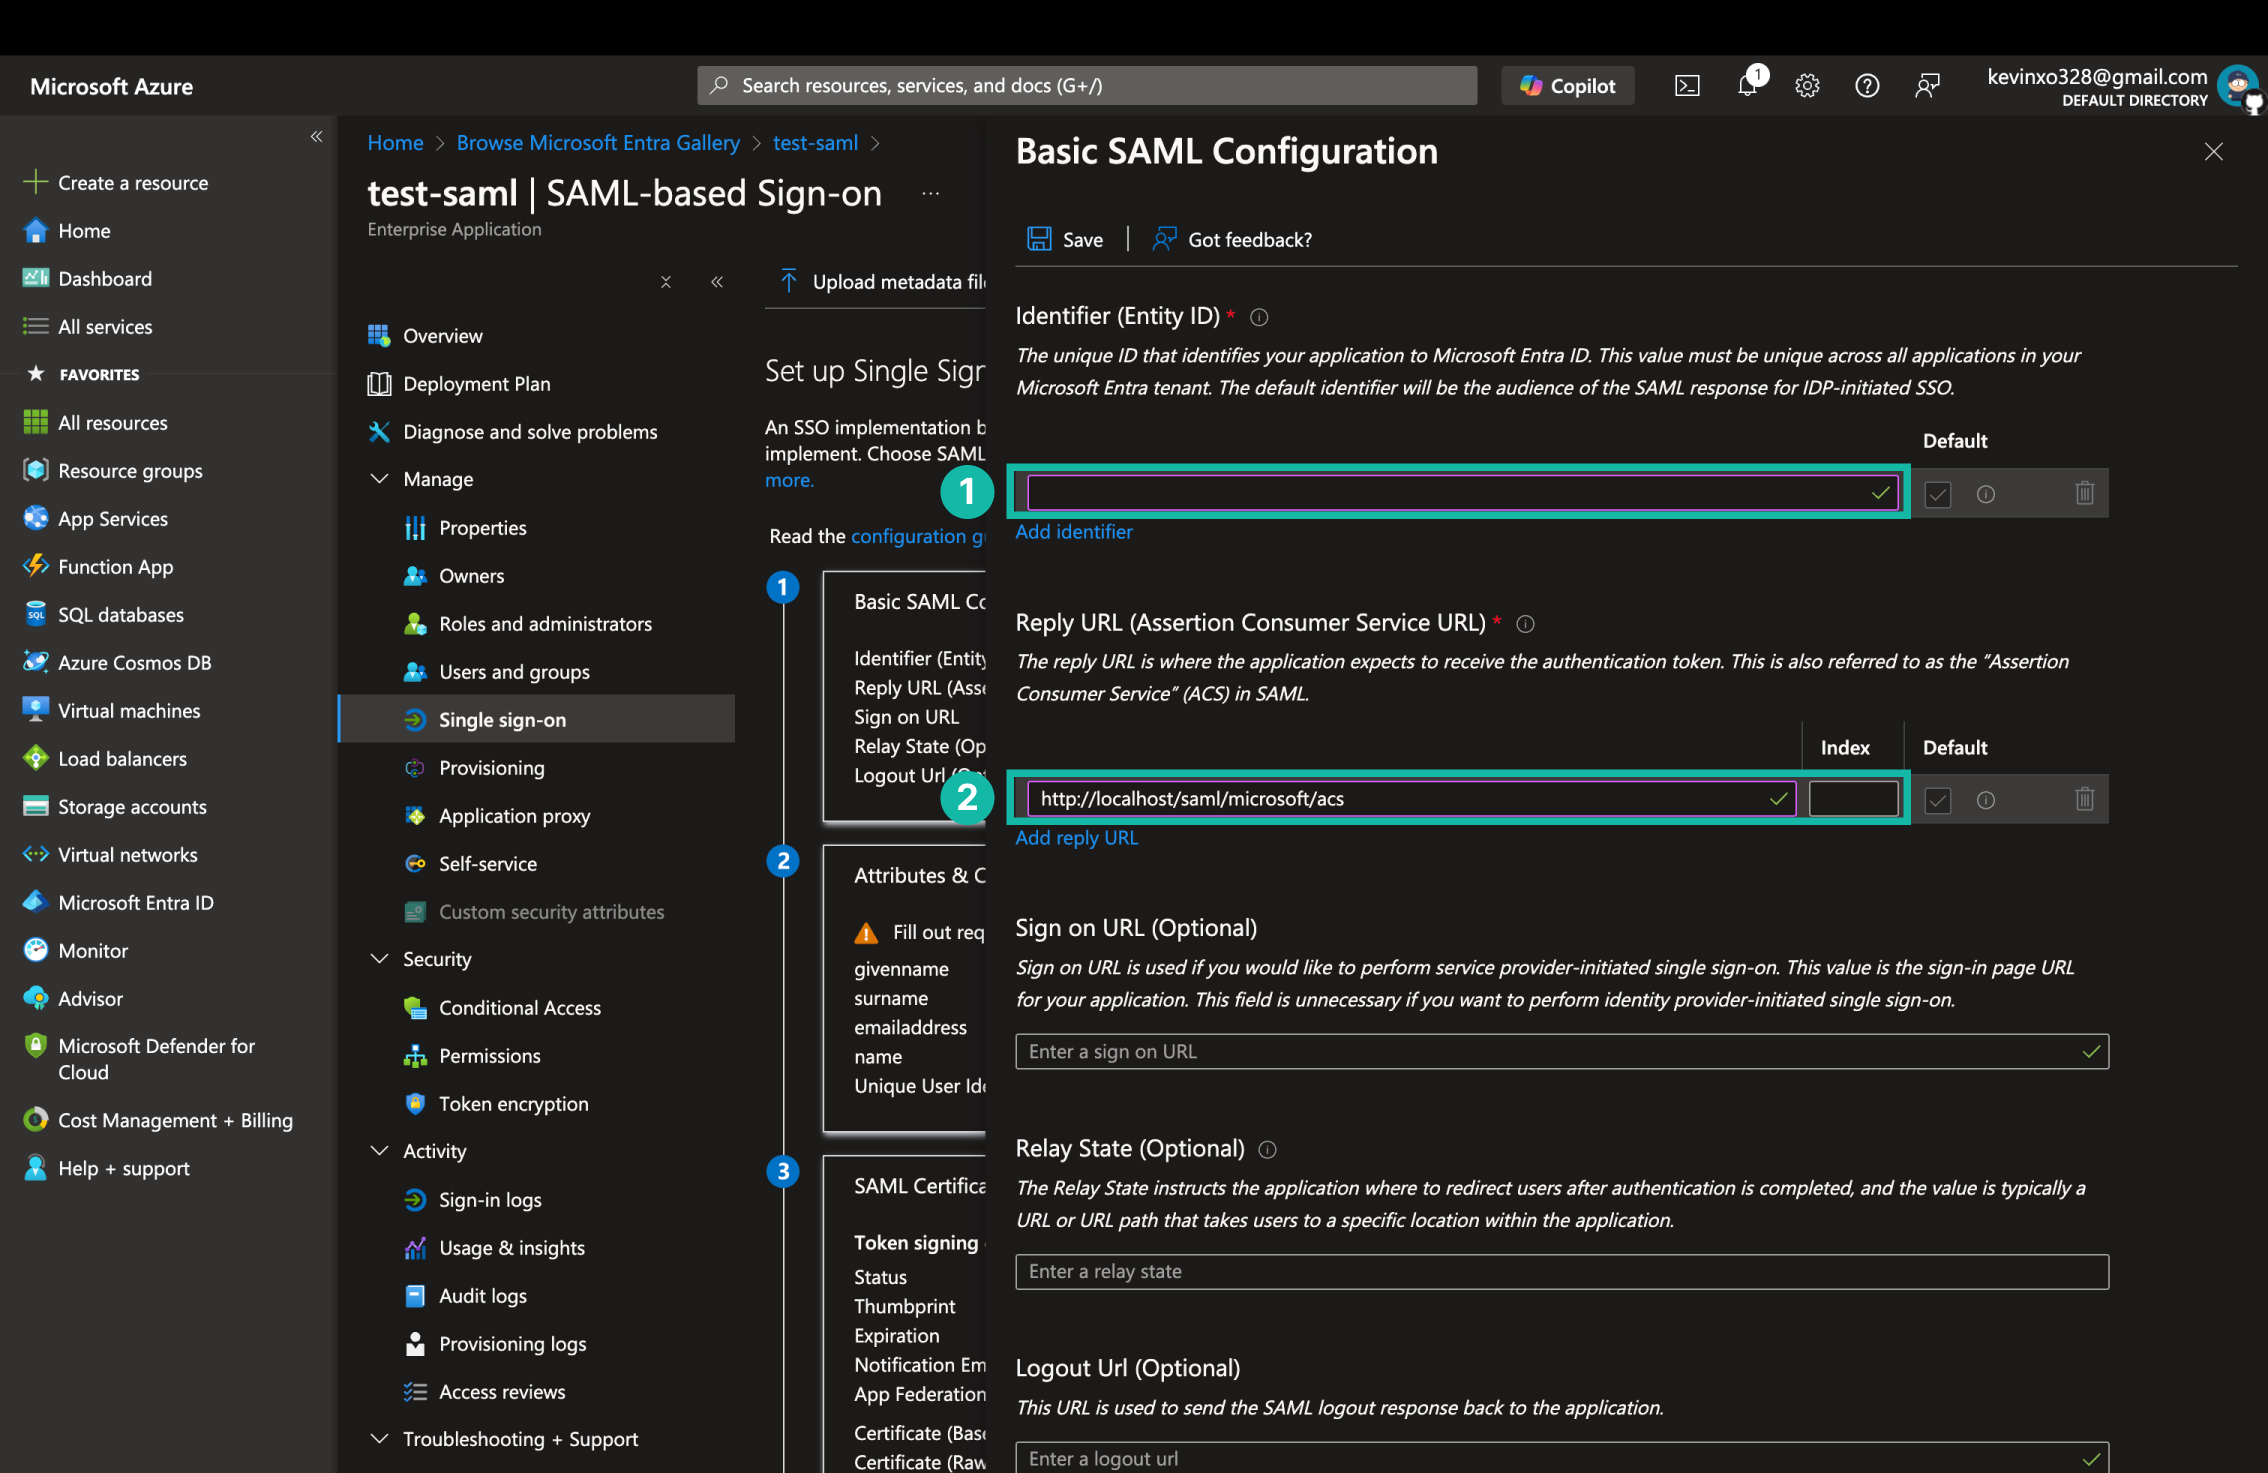
- 輸入 Identifier (Entity ID)。建議可以使用
https://{tenant-name}.onmicrosoft.com/{app-name}。 - 輸入 Reply URL 作為登入後的返回網址後點擊 Save。
設定 SAML 可取得的使用者屬性
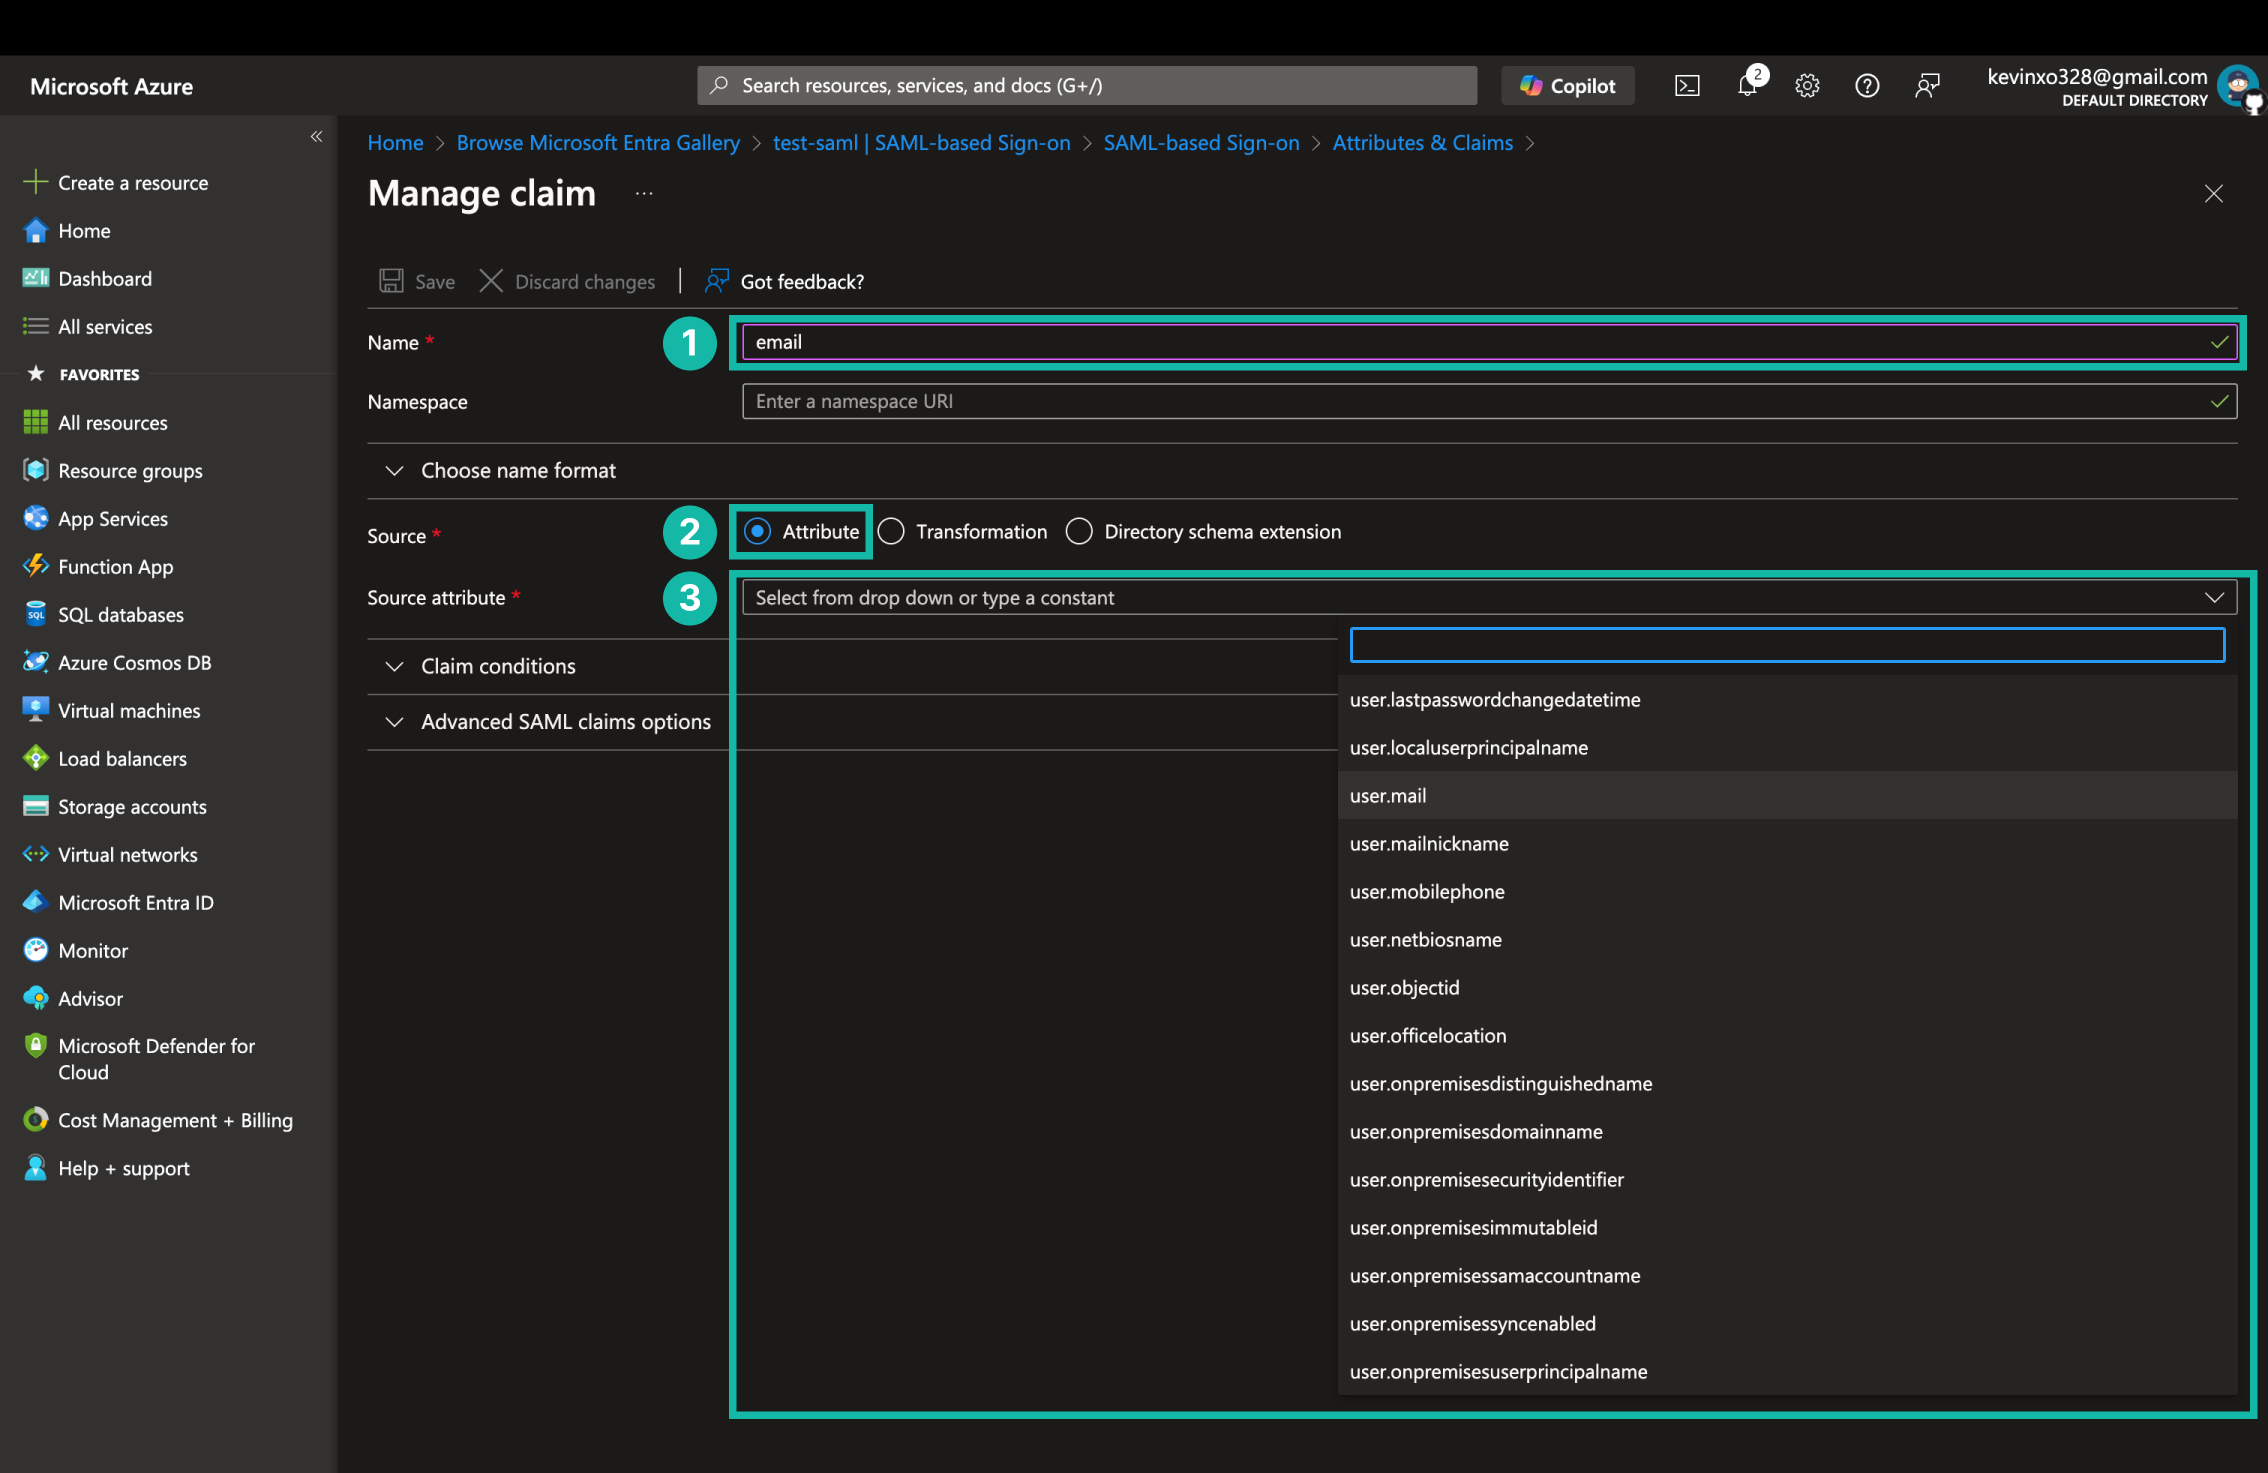
- 輸入 claim name
- 選擇 claim 的來源,這裡選 Attribute。
- 選擇 claim 的值
SAML Metadata
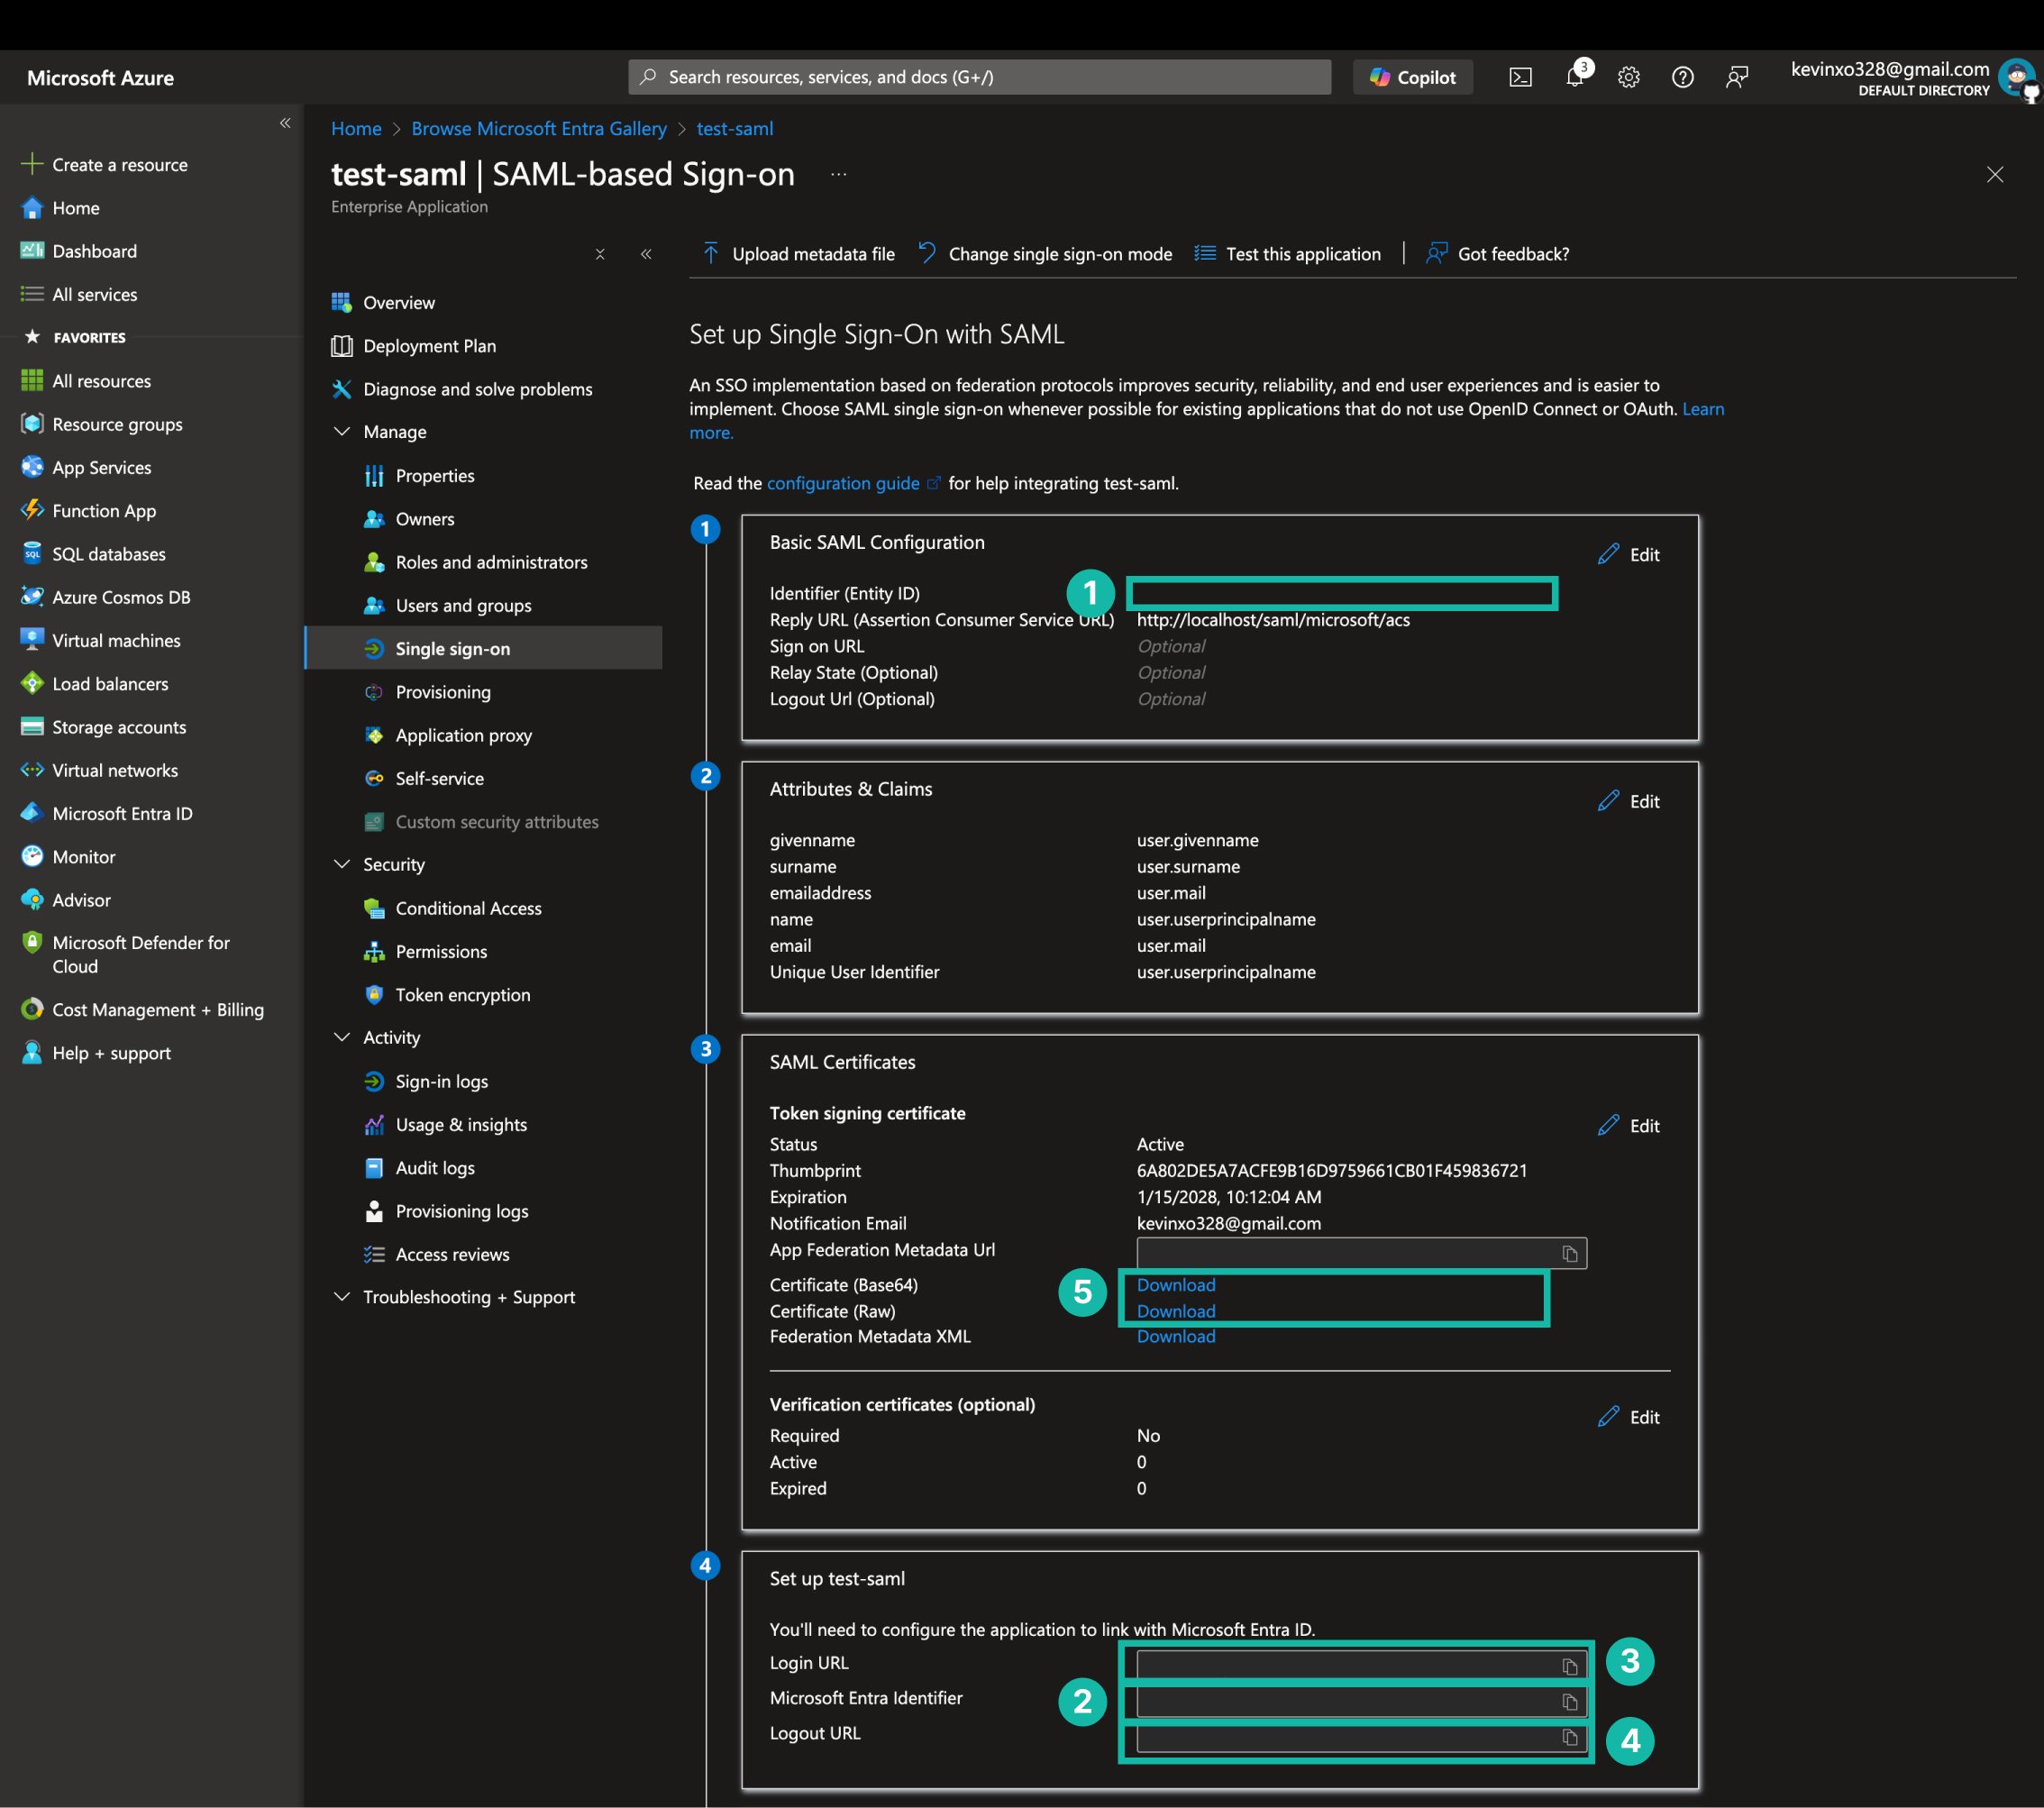
做到這裡幾乎就完成了,畫面上會顯示 SAML Metadata,這是我們後續要用到的資訊。
- SP Identifier (Entity ID)
- IdP Identifier (Entity ID)
- IdP Login URL
- IdP Logout URL
- X.509 Certificate
整合到應用程式
這裡以 Python FastAPI 示範如何整合 Azure Entra ID 的 SSO 功能。
- 安裝
fastapi和python3-saml。
pip install "fastapi[standard]" python3-saml
- 程式碼如下:
from fastapi import FastAPI, Request
from fastapi.responses import RedirectResponse

from onelogin.saml2.auth import OneLogin_Saml2_Auth

app = FastAPI()

# SAML Settings (Replace with your own settings)
SAML_PROVIDERS = {
    "microsoft": {
        "sp_entity_id": "<SP entity ID>",
        "idp_entity_id": "<IdP entity ID>",
        "idp_login_url": "<IdP login URL>",
        "idp_logout_url": "<IdP logout URL>",
        "idp_cert_filepath": "<IdP certificate filepath>"
    }
}

SAML_EMAIL_CLAIM = "email"
SAML_USERNAME_CLAIM = "username"

# SAML Helper Functions
def init_saml_auth_settings(request:Request, provider:str, provider_setting: Dict):
    sp_entity_id = provider_setting.get("sp_entity_id", None)
    idp_entity_id = provider_setting.get("idp_entity_id", None)
    idp_login_url = provider_setting.get("idp_login_url", None)
    idp_logout_url = provider_setting.get("idp_logout_url", None)
    idp_cert_filepath = provider_setting.get("idp_cert_filepath", None)

    if not sp_entity_id:
        error_text = f"SAML {provider} SP entity ID not found"
        log.warning(error_text)
        raise HTTPException(status_code=500, detail=error_text)

    if not idp_entity_id:
        error_text = f"SAML {provider} IdP entity ID not found"
        log.warning(error_text)
        raise HTTPException(status_code=500, detail=error_text)

    if not idp_login_url:
        error_text = f"SAML {provider} IdP login URL not found"
        log.warning(error_text)
        raise HTTPException(status_code=500, detail=error_text)

    if not idp_logout_url:
        error_text = f"SAML {provider} IdP logout URL not found"
        log.warning(error_text)
        raise HTTPException(status_code=500, detail=error_text)

    if not idp_cert_filepath:
        error_text = f"SAML {provider} IdP certificate filename not found"
        log.warning(error_text)
        raise HTTPException(status_code=500, detail=error_text)

    if not os.path.exists(idp_cert_filepath):
        log.warning(f"SAML certificate not found: {idp_cert_filepath}")
        raise HTTPException(status_code=500, detail="SAML certificate not found.")


    # Load the SAML certificate, and remove the header and footer lines and newlines to get the raw certificate string
    with open(idp_cert_filepath, 'rb') as f:
        saml_cert = f.read().decode('utf-8').replace('-----BEGIN CERTIFICATE-----', '').replace('-----END CERTIFICATE-----','').replace('\n','').strip()

    pototcal = "https" if request.url.scheme == "https" else "http"
    host = request.headers.get("host", "localhost")

    origin_host = f"{pototcal}://{host}"
    sp_acs_url = f"{origin_host}/saml/{provider}/acs"
    sp_sls_url = f"{origin_host}/saml/{provider}/logout"

    SAML_SETTINGS = {
        "strict": True,
        "debug": True,
        "sp": {
            "entityId": sp_entity_id,
            "assertionConsumerService": {
                "url": sp_acs_url,
                "binding": "urn:oasis:names:tc:SAML:2.0:bindings:HTTP-POST"
            },
            "singleLogoutService": {
                "url": sp_sls_url,
                "binding": "urn:oasis:names:tc:SAML:2.0:bindings:HTTP-Redirect"
            },
            "NameIDFormat": "urn:oasis:names:tc:SAML:1.1:nameid-format:emailAddress"
        },
        "idp": {
            "entityId": idp_entity_id,
            "singleSignOnService": {
                "url": idp_login_url,
                "binding": "urn:oasis:names:tc:SAML:2.0:bindings:HTTP-Redirect"
            },
            "singleLogoutService": {
                "url": idp_logout_url,
                "binding": "urn:oasis:names:tc:SAML:2.0:bindings:HTTP-Redirect"
            },
            "x509cert": saml_cert
        }
    }

    return SAML_SETTINGS


def init_saml_auth(request_data: Dict, request: Request, provider:str, provider_setting: Dict):
    """
    Initialize the SAML authentication object
    """
    settings = init_saml_auth_settings(request, provider, provider_setting)
    auth = OneLogin_Saml2_Auth(request_data, settings)
    return auth

def get_saml_provider_setting(provider: str):
    """
    Get the SAML provider setting
    """
    if len(SAML_PROVIDERS.items()) == 0:
        raise HTTPException(404)

    provider_setting = SAML_PROVIDERS.get(provider, None)
    if not provider_setting:
        raise HTTPException(status_code=500, detail="Provider setting not found")
    return provider_setting


# SAML Routes

@app.get("/saml/{provider}/login")
async def saml_login(provider: str, request: Request):
    provider_setting = get_saml_provider_setting(provider)
    req = {
        'https': 'on' if request.url.scheme == 'https' else 'off',
        'http_host': request.headers.get('host', ''),
        'script_name': request.url.path,
        'get_data': dict(request.query_params),
        'post_data': await request.form()
    }

    auth = init_saml_auth(req, request, provider, provider_setting)
    sso_url = auth.login()
    return RedirectResponse(url=sso_url)

@app.post("/saml/{provider}/acs")
async def acs(provider: str, request: Request, response: Response):
    provider_setting = get_saml_provider_setting(provider)
    req = {
        'https': 'on' if request.url.scheme == 'https' else 'off',
        'http_host': request.headers.get('host', ''),
        'script_name': request.url.path,
        'get_data': dict(request.query_params),
        'post_data': await request.form()
    }

    auth = init_saml_auth(req, request, provider, provider_setting)
    auth.process_response()
    errors = auth.get_errors()
    error_reason = auth.get_last_error_reason()

    if errors:
        log.error(f"Errors: {errors}, Reason: {error_reason}")
        raise HTTPException(status_code=401, detail=f"SAML Authentication Failed: {error_reason}")

    if not auth.is_authenticated():
        raise HTTPException(status_code=401, detail="Not authenticated")

    attributes = auth.get_attributes()
    name_id = auth.get_nameid()

    email = attributes.get(SAML_EMAIL_CLAIM, [None])[0]
    username = attributes.get(SAML_USERNAME_CLAIM, ["User"])[0]

    if not email:
        log.warning(f"SAML login callback failed, email is missing: {attributes}")d in attributes")

    return {"email": email, "username": username, "name_id": name_id}

@app.get("/saml/{provider}/logout")
async def logout(provider: str, request: Request):
    provider_setting = get_saml_provider_setting(provider)
    req = {
        'https': 'on' if request.url.scheme == 'https' else 'off',
        'http_host': request.headers.get('host', ''),
        'script_name': request.url.path,
        'get_data': dict(request.query_params),
        'post_data': await request.form()
    }

    auth = init_saml_auth(req, request, provider, provider_setting)
    return RedirectResponse(url=auth.logout())

@app.get("/saml/{provider}/metadata")
async def metadata(provider: str, request: Request):
    provider_setting = get_saml_provider_setting(provider)
    saml_setting = init_saml_auth_settings(request, provider, provider_setting)
    settings = OneLogin_Saml2_Settings(settings=saml_setting)
    metadata = settings.get_sp_metadata()
    return Response(content=metadata, media_type="text/xml")